![]()
|
|
|||||
| Home | Tech | Features | Projects | News | Feedback |
Torture
Testing the By Bill Cooke |
||
| In the first part of this story we took you through the step by step install of the MileMarker front hub conversion for the '75-'79 Dodge trucks. This part of the story is going to walk you through what it takes to do the transfer case conversion. This is a hard job and shouldn't be undertaken by a novice. If you doubt your skills have a pro do it for you. If on the other hand you are a true marvel of knowledge and skill then go for it. More about that later, let's first talk about why you need to do anything to the transfer case at all. |
![]()
 Most domestic truck makers had full time 4wd's in the 70's in the
form of the NP 203 (the one we will be dealing with) and Jeep's
Quadra-Trac. I have no idea why that was all the rage back then but it
was. What full-time 4wd means is that both front and rear axles are
getting power from the transfer case. This causes one huge problem, there
has to be a way for the front and rear to spin at different speeds. This
is for cornering or other situation where pressure would build up and lead
to broken parts. This is the same type of thing that your axles themselves
deal with all the time. The inside and outside wheel will spin at
different speeds going around a corner. That's why you have a
"differential" in your axle. To allow different speeds to each
tire. Since this seems to work so well in an axle the big three thought it
would be a great idea to try the same thing in the transfer case. That's
exactly what they did. Right in the back of the T-case is a small
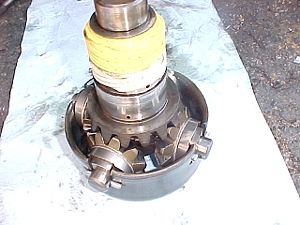
"differential" that consists of 4 spider gears (see picture).
They ride in between 2 main gears (front and back) that apply and deliver
power to the driveshafts. These spider gears allow the front and rear
shafts to spin at different speeds to make handling much better and avoid
breaking parts. If you've ever driven in part-time 4wd in a parking lot
you'll understand the need for this differential. Full-time 4wd's don't
have that jerking, tire chirping habit the way the part-timers do when
they're in 4wd. Most domestic truck makers had full time 4wd's in the 70's in the
form of the NP 203 (the one we will be dealing with) and Jeep's
Quadra-Trac. I have no idea why that was all the rage back then but it
was. What full-time 4wd means is that both front and rear axles are
getting power from the transfer case. This causes one huge problem, there
has to be a way for the front and rear to spin at different speeds. This
is for cornering or other situation where pressure would build up and lead
to broken parts. This is the same type of thing that your axles themselves
deal with all the time. The inside and outside wheel will spin at
different speeds going around a corner. That's why you have a
"differential" in your axle. To allow different speeds to each
tire. Since this seems to work so well in an axle the big three thought it
would be a great idea to try the same thing in the transfer case. That's
exactly what they did. Right in the back of the T-case is a small
"differential" that consists of 4 spider gears (see picture).
They ride in between 2 main gears (front and back) that apply and deliver
power to the driveshafts. These spider gears allow the front and rear
shafts to spin at different speeds to make handling much better and avoid
breaking parts. If you've ever driven in part-time 4wd in a parking lot
you'll understand the need for this differential. Full-time 4wd's don't
have that jerking, tire chirping habit the way the part-timers do when
they're in 4wd. |
|
Now that we have some of the basics down and have covered the why and what. We can get to the nuts and bolts of the install. |
![]()
|
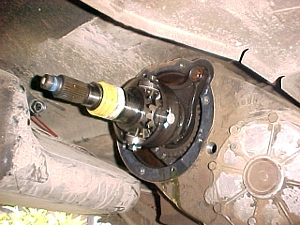
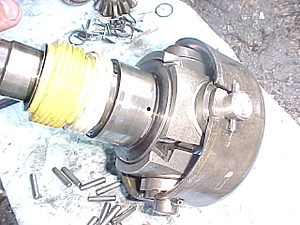
Start by removing the rear driveshaft and draining the T-case. You can then remove the speedo cable and drive gear. You'll need a 1 5/16" socket to get the driveshaft yoke nut off and an impact wrench. Then it's time to pull the rear bearing housing. After that you can pull the differential housing, There will be a lot of extra oil in each so be ready for it. You also want to make sure the tailshaft stays in place when you remove the diff housing. Once you have all that done you can carefully remove the tailshaft. There are a bunch of large needle bearings in the end of the shaft and they will fall out once it out. Be ready to catch them. Next, hold the spacer on the inside of the inner gear in place while you slide the differential unit out. There are even more needle bearing in inner gear and by holding the spacer in place you will not have to deal with them. It's really quite fond on the diff unit so it will not want to part with it easily. This is as far as you need to go with the disassembly of the T-case. Clean the gasket surfaces and move to a clean work bench to start assembling the new parts. |
![]()
 |
Drive the pins out of the differential cross ends and slide the old gears, spacers and needle bearing out of the housing. Remove everything, you will only need the spacers on reassembly. Slide the new MileMarker gears onto the 4 crosses of the diff center and then the outside spacers. You can now place all that over the tailshaft end gear to make the unit you see to the left. Slide the diff housing over that assembly and reinstall the roll pins. You have now converted your transfer case differential to a spool. Make sure everything is really tight and there is no play in the new tailshaft assembly. |
![]()
 |
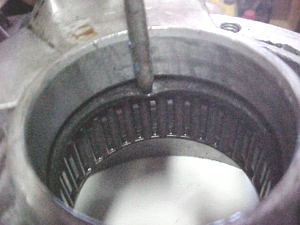
All those needle bearings that came out of the inside of the tailshaft on disassembly now need to be reinstalled. Use some engine assembly lube to help hold them in place while you get everything lined up. If it seems like there is one too many then it's perfect. If the last one goes in without a fight then start looking for the missing one. They are tough to get in. This photo is of the end of the tailshaft. You can see the new square ends of the gears around it. |
![]()
 Now
comes the fun part, setting the endplay (no pics). The kit comes with a
stack of shims to be used to get the 4wd teeth spaced out from the drive
gears but not so far as to wedge into the housing. If that sounds
confusing, it is. We got no instructions what so ever with the kit and had
to try and figure this out on our own. What a nightmare! We never did get
it quite right and had some grinding sounds for the first few miles.
That's not good as there isn't that much material to lose. The other
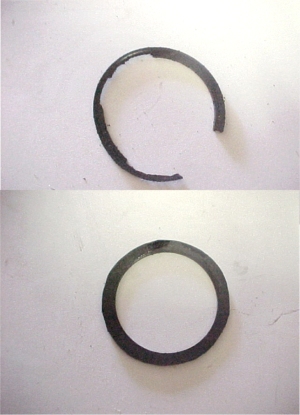
problem we had was with the oil pump seal, or lack of (top). After 22
years and 200,000 miles it was toast. Try finding one of those on a
Sunday. Forget the dealer, we found that Motive Gear still lists it but
couldn't wait that long. So what does a clever young man do when he's left
little choice? He heads for the plumbing department at the local hardware
store and gets "union seal" (bottom). It's made of the same
stuff and is almost exactly the right size. We hade to trim 1/16" of
the outside to get a perfect fit but that's ok. The sealing surface is on
the inside of the seal. Now
comes the fun part, setting the endplay (no pics). The kit comes with a
stack of shims to be used to get the 4wd teeth spaced out from the drive
gears but not so far as to wedge into the housing. If that sounds
confusing, it is. We got no instructions what so ever with the kit and had
to try and figure this out on our own. What a nightmare! We never did get
it quite right and had some grinding sounds for the first few miles.
That's not good as there isn't that much material to lose. The other
problem we had was with the oil pump seal, or lack of (top). After 22
years and 200,000 miles it was toast. Try finding one of those on a
Sunday. Forget the dealer, we found that Motive Gear still lists it but
couldn't wait that long. So what does a clever young man do when he's left
little choice? He heads for the plumbing department at the local hardware
store and gets "union seal" (bottom). It's made of the same
stuff and is almost exactly the right size. We hade to trim 1/16" of
the outside to get a perfect fit but that's ok. The sealing surface is on
the inside of the seal.
Here's a picture of the new seal installed in the differential housing, just in front of the bearing. Make sure it's fully seated so that it fits snuggly around the shaft. This is what oils the whole case. You are going to be better off to get a new, correct seal before you start the conversion. That would have been our choice had we'd of known ahead of time it might be bad. Live and learn. It's holding and seems fine but we've only driven it a 1,000 miles or so since the install. |
![]()
|
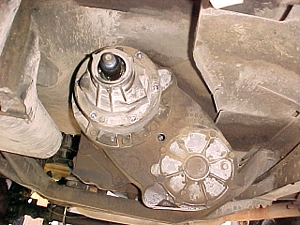
After you have all that done just slam it back together and fill it full of 10W30 oil. Your "HI" and "LO" positions will now be 2wd and "HI LOC" and "LO LOC" will be 4wd. You will also need to stop before engaging 4wd to keep from stripping the teeth out of it. It will drive much differently that it did before so be ready for it. you have a true part-time 4wd now and it's going to drive like one. No more speeding in the rain, sports car handling on twisty roads and avoiding the treadmill test at the smog station. Come to think of it, full-time 4wd wasn't so bad after all. That is if the gas mileage doesn't both you. |
| Contact Info:
MileMarker 1450 S.W. 13th Court |
Click here for part 1 of the MileMarker part-time conversion article |
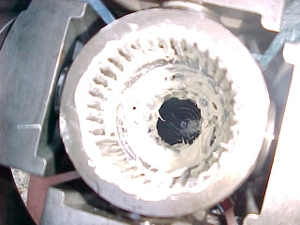
 The problem is that this
differential can leave you stuck if just one tire gets in then air or hits
a big patch of ice. There has to be some way to "Lock" that
differential so that both axles get even power when you need it. The NP
203 transfer case has a "HI" and "HI LOC" as well as
"LO" and "LO LOC" positions. HI and LO are full-time
while HI LOC and LO LOC and closer to a part-time 4wd. Both driveshaft
will spin at the same speed. To facilitate this what they did was put
these little teeth around the differential housing and on a sliding gear
that could be moved to engage with them. This would lock out the spider
gears and make both front are rear spin at the same speed. As you can see
from this picture they aren't very beefy and can't take any serious loads.
That's why you can't simply remove your front driveshaft and drive like
that for very long. These teeth will explode quickly and leave you with
out 4wd at all. The way you must convert the differential is to replace
the spider gears or rear shaft so that all the power is going into the
splines seen on the inside of the collar in the photo. That's what was
designed to handle the power coming from the engine and is the only way to
do this job correctly.
The problem is that this
differential can leave you stuck if just one tire gets in then air or hits
a big patch of ice. There has to be some way to "Lock" that
differential so that both axles get even power when you need it. The NP
203 transfer case has a "HI" and "HI LOC" as well as
"LO" and "LO LOC" positions. HI and LO are full-time
while HI LOC and LO LOC and closer to a part-time 4wd. Both driveshaft
will spin at the same speed. To facilitate this what they did was put
these little teeth around the differential housing and on a sliding gear
that could be moved to engage with them. This would lock out the spider
gears and make both front are rear spin at the same speed. As you can see
from this picture they aren't very beefy and can't take any serious loads.
That's why you can't simply remove your front driveshaft and drive like
that for very long. These teeth will explode quickly and leave you with
out 4wd at all. The way you must convert the differential is to replace
the spider gears or rear shaft so that all the power is going into the
splines seen on the inside of the collar in the photo. That's what was
designed to handle the power coming from the engine and is the only way to
do this job correctly.